Getting Started with Slack
This page has been set up to help you get started on Slack, a closed messaging and file sharing platform we will be using for our class. Since all announcements and peer editing happens on this system, it is imperative you be signed up and ready to. Earlier is better, and the latest time to get all set is Monday morning prior to class, which begins as 11:00 am. For those of you unfamiliar with Slack, I recommend this two minute video to get a sense of how it works. Once you've taken a look at that, come back here to continue with the steps below.
- Open a new tab on your browser, so you can be working into windows. In that second tab, go to your NYU email.
- Find the find the piece of mail sent by Slack.
If you can’t find that email, contact me immediately at terri.senft@nyu and I will send you another. - Open the Slack email, and click the link the big button that says “join team."
You should now be at a page called Join Approaches 2016. - Create a username and password for yourself, and press enter.
I recommend your username be your first name, since that will allow others in class to easily recognize you online. - You will now see a page that looks something the one below (minus the arrow):
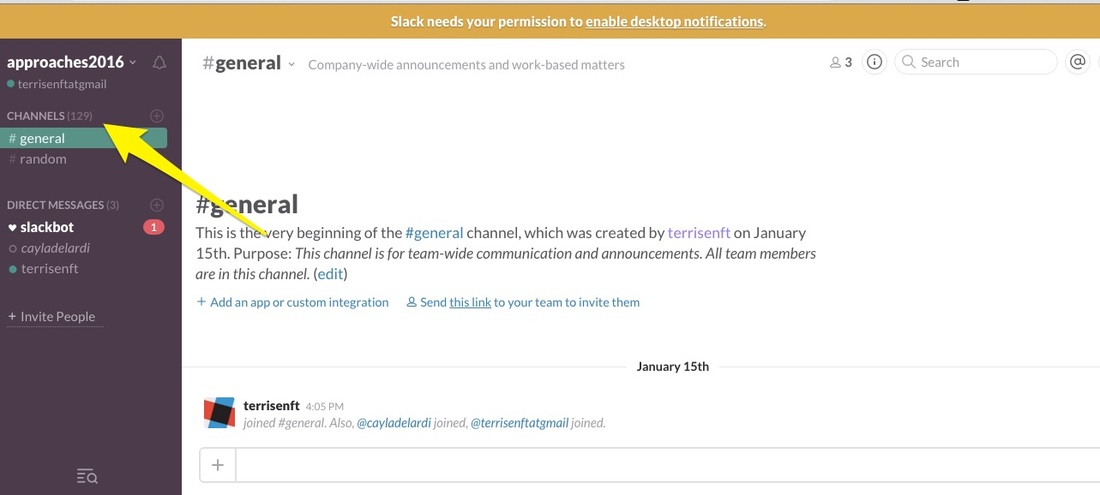
6. We are going to do a few things right away while on this page. First, go up to the top bar where it says, “Slack needs your permission to enable desktop notifications.” Go ahead and click that to agree.
7. Next, I want you to look over on the left-hand side of your screen for the word CHANNELS (129) It's marked with a big yellow arrow in the screen shot, above. Channels can be thought of as individual chat rooms/repositories of student work. You’ll notice our group already has 129 channels, and we haven’t even begun! Don’t worry, though. You’ll only be in about seven of these channels, for reasons you’ll understand in a moment.
8. Click on CHANNELS and you should reach a page that looks like this:

9. One of the great features of Slack is that it automatically puts you on some channels, and allows you to join (or make) others as time goes by. You are added to two channels immediately:
- General (for class announcements and such)
- Random (for pet pictures, mostly)
As you scroll down the channel menu, you’ll start to see that most of the channels on this page are arranged by student first name. That’s because before you arrived, I set up some individualized channels for each of you.
10. The next step will take some time (like, two minutes), but it's a one-time thing. To see your specific channels on your start page, you must activate (join) them. We'll do that now.
11. Type your first name into the search bar. You should see these channels listed:
- #yourname-autobiography
- #yourname-city-notes
- #yourname-daily-assignment
- #yourname-final-project
- #yourname-meetings
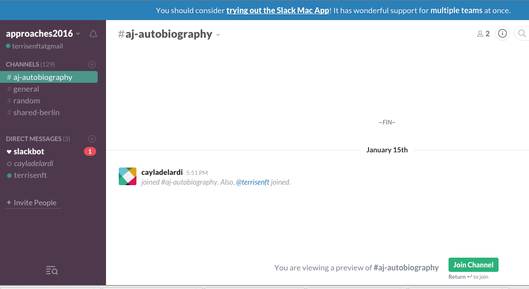
12. Let’s join your first channel . First, find the channel yourname-autobio, and click on it. You should reach a page that looks like the one below. Click the green “join channel” button at the bottom of the page, and you are in.
13. Now that you’ve joined your first channel, let’s join the rest, one at a time (unfortunately there is no “group add channel function.”)
A reminder of the steps:
14. As you add channels, they should appear on the left hand side of your Slack window. When you are finished, you should see that you have joined
15. There is one final shared channel you need to join that isn’t associated with your name, but with the city you’ll be studying abroad. To join that:
#yourname-city-notes
#yourname-daily-assignment
#yourname-final-project
#yourname-meetings
#shared-CITYNAME
16. Now that you have all the dull stuff out the way, you can start to have some fun:
A reminder of the steps:
- Go to the CHANNELS section and click
- From the browse page, search for your first name
- Find the next channel you haven’t joined associated with your name and click
- When you wind up at the channel page, click the green “join” button
- Time to join the next channel.
- Go back to the CHANNELS section
- Search for your name
- Find the next channel you haven’t joined, and repeat the process.
14. As you add channels, they should appear on the left hand side of your Slack window. When you are finished, you should see that you have joined
- #yourname-autobiography
- #yourname-city-notes
- #yourname-daily-assignment
- #yourname-final-project
- #yourname-meetings
15. There is one final shared channel you need to join that isn’t associated with your name, but with the city you’ll be studying abroad. To join that:
- Go to the CHANNELS section and click on it
- From the browse channels page, search for your STUDY ABROAD CITY name
- When you wind up at the channel page, click the green “join” button.
- Now your sidebar should read:
#yourname-city-notes
#yourname-daily-assignment
#yourname-final-project
#yourname-meetings
#shared-CITYNAME
16. Now that you have all the dull stuff out the way, you can start to have some fun:
- First, give me a shout out message so I know you have finished setting up. You can do this from any channel by typing @terrisenft.
- Next, head to the General channel, where you find two things:
----a link to our class web site : which includes your syllabus, assignments and all sorts of other things
----a document that has the names and photos of all your classmates. - If you see someone you know on the classmates document, go ahead and say hi to privately.
To do this, go to private/direct messages on the left hand side of the screen and click on their name.Note: If they haven’t signed up for Slack yet, their name won’t appear until they do. Enjoy! - Finally, head to the Random channel to see an excellent photo of my cat, Nero. Feel free to practice using the upload feature to show the class a picture of your pet, if you have one. Sorry, siblings do not count as pets.
